Customer.io is a popular platform for sending automated messages and emails to your customers, with a focus on security and privacy. With Customer.io, you get complete information about your customers in one place, and use it to create personalized messages and campaigns for them.
RudderStack supports Customer.io as a destination to which you can seamlessly send your event data.
Getting started
RudderStack supports sending event data to Customer.io via the following connection modes:
| Connection Mode | Web | Mobile | Server |
|---|---|---|---|
| Device mode | Supported | - | - |
| Cloud mode | Supported | Supported | Supported |
https://assets.customer.io/ domain. Based on your website's content security policy, you might need to allowlist this domain to load the Customer.io SDK successfully.Once you have confirmed that the platform supports sending events to Customer.io, follow these steps:
- From your RudderStack dashboard, add the source. From the list of destinations, select Customer.io.
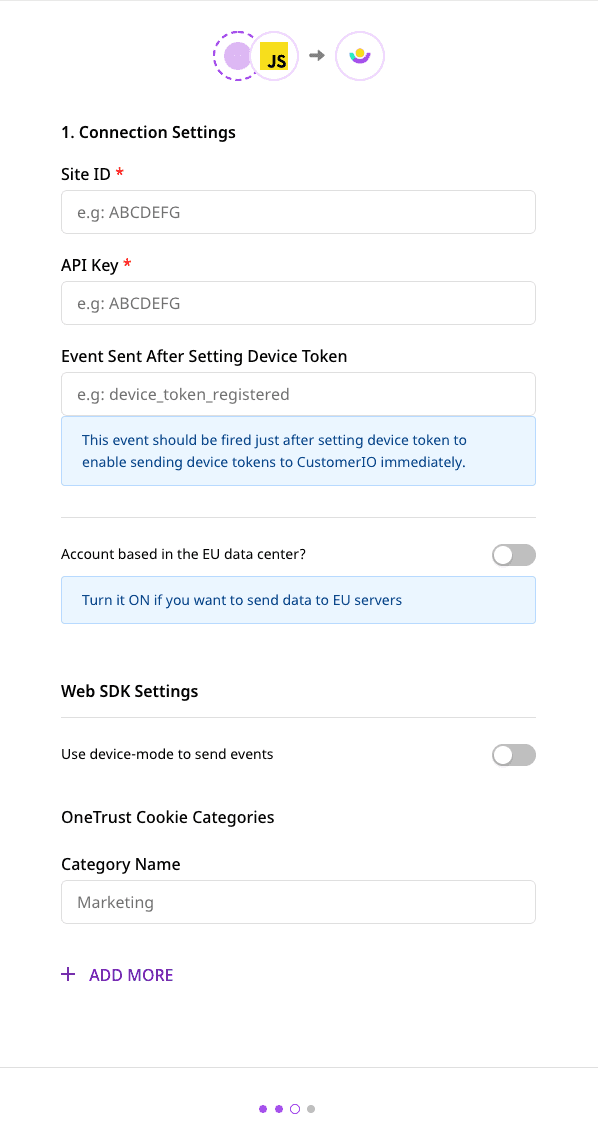
- Assign a name to the destination and click Continue. You should then see the following screen:

Connection settings
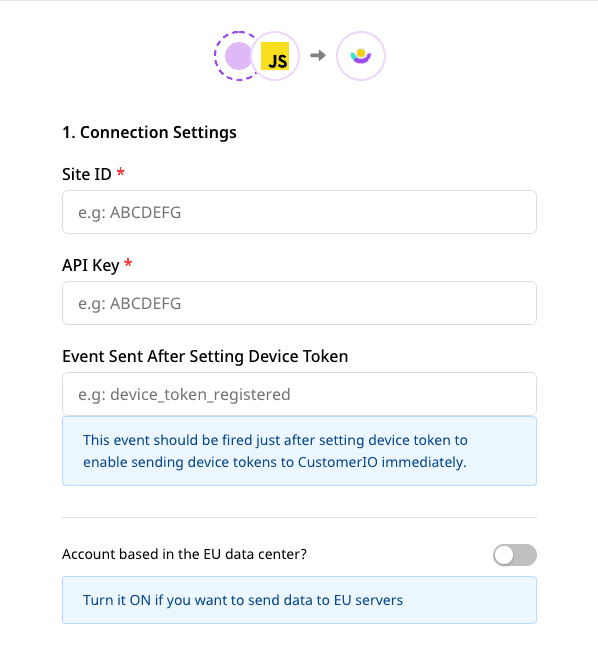
The connection settings required to configure Customer.io as a destination in RudderStack are listed below:
- Site ID: Enter your Customer.io site ID.
- API Key: Enter your Customer.io API key.
- Event sent after setting device token: Enter the name of the event that is fired immediately after setting the device token.
- Account based in the EU data center?: Enable this option in case your account is based in the EU region.
Web device mode settings
- Use native SDK to send events: Enable this setting to send the events through Customer.io's native JavaScript SDK.
- OneTrust Cookie Category: Specify the OneTrust category name for mapping the OneTrust consent settings to RudderStack's consent purposes.
Finally, click Next to complete the setup. Customer.io will now be enabled as a destination in RudderStack.
Identify
The identify call sends the event data to Customer.io along with the properties that you pass as the RudderStack traits.
userId is a mandatory field for Customer.io. If it is not provided, RudderStack uses anonymousId instead.RudderStack also sends the createdAt field as created_at to Customer.io to register the user signup time.
A sample identify call is as shown:
rudderanalytics.identify("userId", { name: "Tintin", city: "Brussels", country: "Belgium", email: "tintin@herge.com"});As createdAt is not present in the above call, RudderStack will append the current timestamp value and send the field to Customer.io.
email cannot be used to make consecutive identify calls with different userId.Unsubscribing users
You can pass unsubscribed: true in the identify call to unsubscribe a user in Customer.io, as shown in the following snippet:
rudderanalytics.identify("userId", { email: "tintin@herge.com", unsubscribed: true});Page
If you are using a native SDK, the Customer.io JavaScript snippet is loaded and captures the page view automatically. You can also call rudderanalytics.page() that sends the page event along with any associated properties that you want to pass along with the call.
A sample page call is as shown below:
// "home" is the name of the page.rudderanalytics.page("home", { path: "path", url: "url", title: "title", search: "search", referrer: "referrer",});Screen
The screen call lets you record whenever your user views their mobile screen, with any additional relevant information about the screen.
If you have turned on the screen views in your app implementation from the iOS or Android SDK, they will be registered as Viewed <screen_name> Screen under the Activities tab for the user.
RudderStack will also forward the event properties passed along with the screen call to Customer.io as they are received.
A sample screen call using RudderStack's iOS SDK is shown below:
[[RudderClient sharedInstance] screen:@"Main" properties:@{@"prop_key" : @"prop_value"}];The above event will be transformed as Viewed Main Screen and sent to Customer.io.
Track
The track call lets you capture user events along with the properties associated with them.
A sample track call is as shown below:
rudderanalytics.track("Track me", { category: "category", label: "label", value: "value",});Alias
The alias call lets you merge different identities of a known user. RudderStack merges the attributes of both the user identities by retaining the attributes of the primary identity and merging the additional attributes of the secondary identity.
A sample alias call is as shown below:
rudderanalytics.alias("test_new_id", "old_user_id");alias call is applicable only when both the users are present in Customer.io.Device token registration
RudderStack registers the device token to Customer.io for the following application lifecycle events:
Application InstalledApplication Opened
To use this feature, enable the trackApplicationLifecycleEvents feature in your mobile SDK implementation code. Also, you need to register your device token after initializing the SDK.
The following snippets demonstrate registering the device token for iOS and Android:
[[[RudderClient sharedInstance] getContext] putDeviceToken:[self getDeviceToken]];RudderClient.putDeviceToken(getDeviceToken())Alternatively, you can also enter the preferred event name during the Customer.io destination configuration in the RudderStack dashboard, as shown:

The following snippets highlight sending the device_token_registered event after setting the device token in your app:
[[RSClient sharedInstance] track:@"device_token_registered"];rudderClient!!.track("device_token_registered")RudderStack also supports the removal of the device (identified by device_id) whenever a custom event Application Uninstalled is sent to Customer.io.
FAQ
Where do I find the API Key and Site ID for configuring Customer.io in RudderStack?
To obtain the API Key and Site ID, follow these steps:
- Sign into your Customer.io dashboard.
- In the left panel, click Settings and select Account Settings.
- Then, click API Credentials. You should find the site ID and API key for your project listed here, as shown:

Contact us
For more information on the topics covered on this page, email us or start a conversation in our Slack community.